
Making straight cuts with a jigsaw is something that woodworkers and carpenters have to master on. But when it comes to making precise, smooth, and accurate curves on a subject, things become a little difficult. Especially for users who’re new to the game.
Upon popular demand, we have, therefore, decided to come up with a complete list of steps of how to use a jigsaw to cut curves. Apart from the steps, we’ve also listed the tools required to go through the steps and a list of precautions.
Take a moment of a break from whatever you are doing, and go through the complete piece-
Items You Need to cut curves using the jigsaw
Of course, Jigsaw is the key tool here when we are talking about cutting curves with a jigsaw. But apart from that, you need a few other tools. And before starting the steps, we would like to focus on the list of that.
Here we go-
The Jigsaw
There are a number of variations when it comes to jigsaws. But the one that we would love to have here should be of very high RPM. Also, it should have a variable speed trigger to make sure that you have firm control of the speed of it.
The Scrolling Blade
The blades that we equip a jigsaw with are called scrolling blades, and it’s an important part of the process. For this job, you need one with a slim profile and quite some flexibility in use.
Curve guide
While you will be creating curves with a jigsaw, you need to direct the blade in a particular path, which is the profile of the curve. Experienced woodworkers can do that from their instincts. But in case you are new to this job, you must need a curve guide.
Power Sander
Sanding is an essential part of most woodworking jobs. Once you will be done with cutting the curve onto the workpiece, you have to work on the corners and edges to smoothen them up. We call it the finishing, and a power sander will be your tool at this step.
Steps By Step Guide on How to Use A Jigsaw to Cut Curves
Alright, we’re not at the core of the article, where we will be taking you through a set of steps that involves the process of cutting curves with a jigsaw. Equip yourself with the required tools, and let’s proceed-
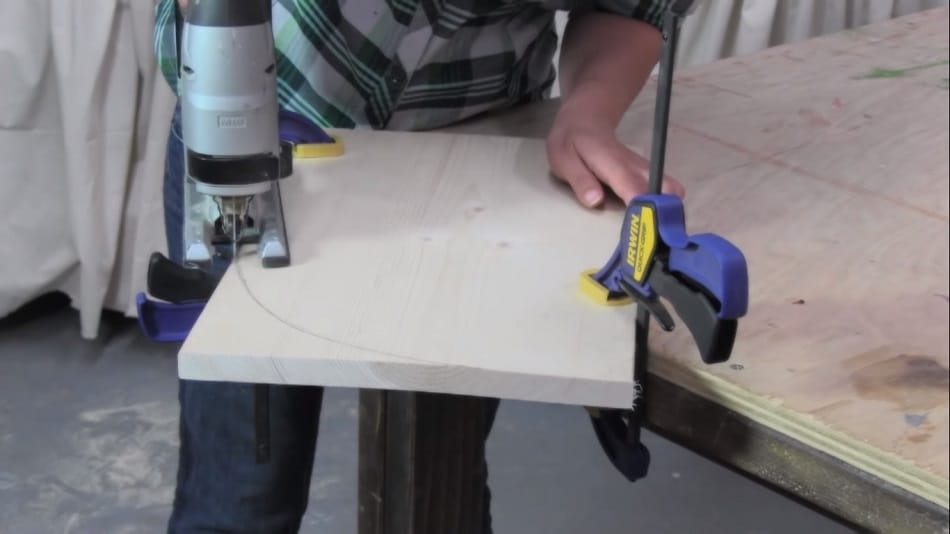
Step 1: Clamp the board
At first, you need to ensure that the board that you are cutting the curve on, stays stable throughout the process of creating curves.
For that, put your board on the table, and use marking to make sure it’s in the desired position. Make it certain that you have at least more than half of the board on the table, to make it stable. Another half of the board should be hanging on the air, and that’s the part where you’ll be working on.
To ensure a top-notch position of the board on the table, you can use clamps. With most of the professional carpenter’s table, there come clamps that would help you out here.
Talking about clamps, we recommend using at least a couple of clamps to ensure secure positioning.
Step 2: Prepare Yourself
The board is ready and clamped, the tools are in hand, now it’s time for you to prep yourself up.
What we mean is, while you’re performing an operation like this, there are a number of safety precautions that you need to maintain. The list includes wearing an eyeglass, wearing protective gloves, putting on earplugs to prevent your ears from the excessive noise that these devices will produce, and so on.
Once done, let’s move on to the most important step of this list.
Step 3: Cut the curve
This is the step where the main action will take place. Place your jigsaw on the nearest end of the board from where the guide starts. Now, pull it on to the power, and make sure there is a smooth start of the machine.
Go slow and nice towards the guide of the curve. In case you don’t have a curve guide, make sure to put a pencil mark on the places.
One important thing about the cutting process that you need to watch out for is the blade bevelling. It happens quite a lot when you’re performing works like this.
To make sure that your blade is not bevelling, make sure to keep re-adjusting the blade. Ensuring that, go from one corner to the other one at a stretch.
Step 4: Finish Up the Work
Once you are done with the work, you have to ensure that it’s finished in a proper manner. Over the edge of the curve, it should be quite rough, and you need to finish that right away.
To finish the unfinished corners and edges, you can use a power sander to do that. If you don’t have one, you can use the usual grit papers to make that done.
Once done, our steps of cutting a curve using a jigsaw are done.
Safety and Usability Tips
While you are going through the steps(especially, step 3), there are a number of facts that you should keep in mind.
Here is a list-
- Make sure that you’ve made your marking in a precise way.
- Pick up the right saw blade for your jigsaw. Otherwise, it will turn into an incomplete or improper cutting.
- Keep the position of the curve guide slow, nice and steady.
- While working, take your hands off from near to the blade.
- Keep a sharp eye on the blade, and ensure that it’s in a proper way.
- Don’t even start working before clamping the board securely.
Bottom Line
Hey, pat your back! You’ve just finished a 1000 words article on how to use a jigsaw to cut curves. There are even complicated to more complicated kinds of tasks that a jigsaw can do on a Board. Hopefully, we’ll talk about them soon on this platform.
Good luck and safe woodworking!
Related Article: